






Printer alignment test page
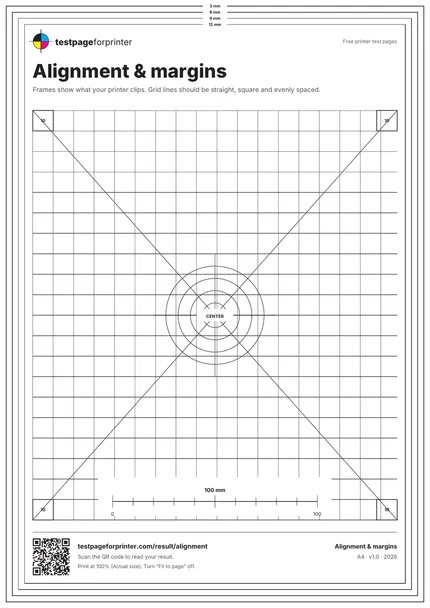
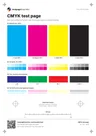
A printer alignment test page with a grid, diagonals, a center target and margin frames to show clipping, skew and scaling.
What each part checks
One sheet. Six useful checks.
- 1
10 mm grid
A fine grid over most of the page. Lines should be straight, square and evenly spaced.
- 2
Corner-to-corner diagonals
Two diagonals that cross the grid. They help you see if the page is skewed or stretched.
- 3
Center target
Concentric circles at the page center with a crosshair in cyan, magenta, yellow and black. Colored fringes suggest inks that do not line up.
- 4
Four 10 mm squares
One square near each corner of the grid, each labeled 10. Measure them to check scale.
- 5
Margin frames
Nested frames at 3, 6, 9 and 12 mm from each edge. The innermost frame you can see all the way around is your printable margin.
- 6
Footer and scale cues
Footer text reminds you to print at 100%, and the squares and grid give you measurable references.
How to read your print
- Complete frames.
- If a frame is cut off on any side, the printer cannot print that close to the edge.
- Square corners.
- The grid should look square. A trapezoid or slanted grid suggests paper skew or feed issues.
- Even spacing.
- Measure a few grid cells. If they are not 10 mm, the page was scaled.
- Clean center.
- Colored edges on the center crosshair mean the inks are slightly out of register.
Print settings that matter
- 1Print at actual size (100%)Use Actual size or 100% and turn off Fit to page. Without this, the squares and frames are meaningless. Menu names vary by program.
- 2Turn off borderless printingIf your driver has a Borderless or Expand option, turn it off for this test, because it enlarges the page and hides the real margins.
- 3Load paper straightAlign the paper guides snugly against the stack and use the paper size that matches the PDF, Letter or A4.
- More printing tips
Related sheets

What this printer alignment test page is
This sheet checks where your printer actually places ink on the paper. It prints a measured grid, diagonals, a center target and four nested frames at 3, 6, 9 and 12 mm from the edges. It works as a printer margin test, because the frames show how close to the edge your printer can reach before clipping.
When to use it
Use it when text or images are cut off at the edge, when a print looks crooked, after a paper jam, after moving the printer, or when you want to know your real printable margins before designing labels or layouts. It also helps when a document prints slightly too small or too large.
How to print it
- Choose the PDF that matches your paper. Letter and A4 have different dimensions, and the A4 vs Letter guide explains why this matters.
- Open the PDF and choose Actual size or 100%. Turn Fit to page off.
- Disable any borderless or expand option in your printer settings.
- Print on plain paper, then measure with a ruler.
If the page prints smaller than expected, read about prints too small, and use the scale check tool for a measured comparison. The Windows and Mac guides show where scaling is set.
What good looks like
All four squares measure about 10 mm. The grid looks square and even. The diagonals meet at the corners with no obvious tilt. At least the outer frames appear on all four sides, and the center target is clean. Which frames you can see depends on your printer. Many printers cannot print right to the edge, and that is normal.
What bad looks like
If the grid slants, or one side of the frames is cut off much more than the others, the paper is probably feeding crooked or the paper guides are loose. If squares measure too small, the page was shrunk to fit. Colored fringes on the center crosshair suggest the inks are slightly out of register. See misaligned print for a step-by-step approach.
Lighting and viewing angle matter little here, but a ruler matters a lot. Use a metal or clear plastic ruler with millimeter marks, and measure from the outside of one line to the outside of the next. Check both the width and the height of the page, since a printer can scale one direction more than the other.
What to do next
Scan the QR code or open Read your result to match your print to a likely cause. If your printer has an alignment or print-head alignment routine, run it, then reprint and compare. Names and menu locations vary by model, so check the maker page for your brand: Epson, Canon, HP or Brother. For two-sided jobs, also try the duplex test.
Once you know your margins, keep important content inside them. Write the smallest visible frame down, and you will not have to guess again.